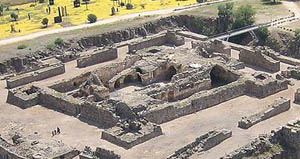
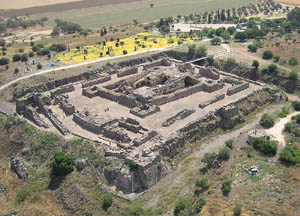
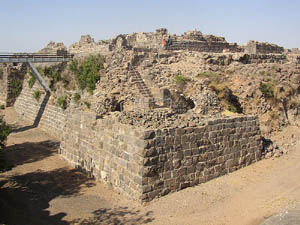
Belvoir Castle
|
|
||||||||||||||||
|
The security of the Crusader Kingdom of Jerusalem in the twelfth century was dependent upon a network of fortifications, mainly along its eastern border which was vulnerable to Muslim attacks. The Hospitaller castle of Belvoir was one of these. It is the first datable true concentric castle. It was built shortly after 1168 on top of a basalt plateau. Twelfth century Muslim historians refer to it as a ‘nest of eagles' and the 'dwelling place of the moon’. About 50 knights and 450 soldiers lived in Belvoir, along with their families and staff. Though in ruins it is one of the best preserved crusader castles in Israel - and not to be confused with the castle in England also called Belvoir Castle. | |||||||||||||||
|
Location
The Crusader fortress of Belvoir is located on a hill of the Naphtali plateau, some 20 km. south of the Sea of Galilee and about 500 meters above the Jordan Valley. The fort was constructed high above the Rift Valley, isolated from the nearby farmlands and roads. Surrounded by a moat, and built with an outer and inner fortress. It overlooks the winding Jordan River below and faces the hills of Gilead in todays Kingdom of Jordan and lies a few miles south of Lake Tiberias (the Sea of Galilee). Belvoir fortress stands in an area of modern Israel called the Heights of Issachar. Crusader names for the Frankish settlement at Kuwaykat included Beauvoir, Belvoir (‘Fair View’ in French), Bellum videre, Coquet, Cuschet and Coke. In Hebrew it is known as Kohav Hayarden, meaning Star of the Jordan which preserves the name of Kohav, a Jewish village which existed nearby during the Roman and Byzantine periods. During the Muslim period the place was known as Kawkab al-Hawa, meaning "Star of the Winds" a reference to the strong winds on this hill top. An Arab writer described Belvoir as "set amidst the stars like an eagles nest and abode of the moon". |
|
|
|||||||||||||
|
||||||||||||||||
|
History
The first structure here overlooking Jordan valley was modest; it was part of the feudal estate of a Frankish nobleman named Velos who lived in Tiberias, a small fortified agricultural settlement. Velos sold it to the Khights Hospitallers in 1168; the Hospitallers understood the strategic importance of the site early on. From Belvoir, the garrison within could closely watch the bridge over the Jordan, which served as the eastern entryway from Gilead into their Kingdom, as well as the roads in the valley leading to Galilee. They erected a huge fortress with impenetrable defences. It tooksome 5 years to complete. Hundreds of workers were involved in the construction. Belvoir was as an obstacle to the Muslim goal of invading the Crusader Kingdom of Jerusalem from the east. It withstood the attack of the Muslim forces in 1180. During the campaign of 1182, the Battle of Belvoir Castle was fought nearby between King Baldwin IV of Jerusalem and Saladin. (see below) Following the crushing defeat of the Crusaders at Hattin, 12,000 Muslim soldiers led by Saladin marched across the Yarmuk River, which joins the Jordan River south of Galilee, heading into the hills and approaching Belvoir. The network of fortifications that the Crusaders depended on was already in collapse; Sidon, Beirut, Acco, Jaffa, Nazareth and Jerusalem were all captured or surrendered. The Crusaders retained control only over Tyre, Safed, and Belvoir. Saladin’s forces attacked belvoir, attempting to undermine the barbican and walls with tunnels. Some of the walls did collapse, but the masonry held, due to a clever technique when the stonework was laid. The joints were filled with metal, linking the basalt stones together and increasing the structural strength of the walls. Saladin’s losses were heavy, and the siege went on for a year and a half. Even after this time, the fortress was never overrun. The knights of Belvoir had held out aslong as anyone could expect, but there was no future for them here. They occupied an outpost of a kingdom that was already receeding into history. Terms were negotiated and Belvoir surrendered. The knights were given free passage to Tyre. Saladin ordered that the fortress gates be pulled down, for fear that the Crusaders might return. The fortifications were slighted in 1217-18 by Muslim rulers who feared the reconquest of the fortress by the Crusaders. The Crusaders did return to the area in force a few years later under Richard the Lionheart, but only briefly. The Crusaders never recovered from the defeat at the Horns of Hattin and its aftermath. In 1240 Belvoir was ceded to the Crusaders by agreement, but lack of funds did not permit them to restore the fortifications and it returned to Muslim control. The fortress of Belvoir remained in ruins until comprehensive excavations were conducted in 1966. The fortifications, well preserved under masses of rubble, were revealed and, on completion of the restoration work, the site was opened to visitors. It is the most complete and impressive Crusader fortress in Israel. |
|
|
|||||||||||||
|
|
||||||||||||||||
|
||||||||||||||||
|
Architecture
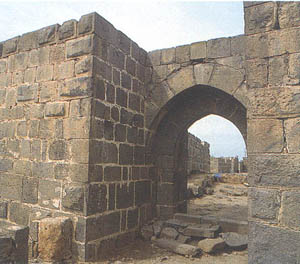
Belvoir is an early example of the concentric castle plan, developed in later crusader castles - in fact this is the first known concentric castle. The castle was highly symmetric, with an outer and an inner fortress.. Theouter fortress had a rectangular wall, reinforced with square towers at the corners and on each side. This surrounded an inner fortress with four corner towers and one on the west wall. Vaults on the inner side of both walls provided storage and protection during bombardments. The walls were built of large basalt ashlars held together by U-shaped iron joints. Well-protected cisterns for the storage of rain water guaranteed the water supply in times of siege. The main entrance through the outer walls lies on the eastern side, but the entrance to the Keep lies on the Western edge, forcing attackers to battle through heavy fire through the castle.
The Outer FortressThe outer walls measued 110 x 110 metres. The structure was built in such a way that it could cover attacks from all sides. An external tower surrounded by a low wall (a barbican) was built on the eastern side, which controlled the dead space on the slope of the hill, both visually and with firepower. The main entrance to the fortress was an outer gateway from the south-eastern corner. From here, one proceeded up a paved ramp to the top of the external tower, turned back and continued to the inner gate of the fortress. This fortified gate was closed with a wooden door covered with metal and locked from the inside with a heavy wooden beam which fit into slots in the adjacent walls.. A secondary entrance to the fortress was from the west, over a bridge suspended over the man-made moat. The moat was dry, 14 metres deep and 20 metres wide, and designed to prevent siege engines from coming close to the fortifications. A drawbridge could be raised or destroyed when the fortress came under attack. The dry moat surrounded the fortress on three sides while the steep slope and the external tower protected its eastern side. Huge towers rose at the four corners of the fortress, with additional towers between them at mid-point. The broad bases (taluses) of the towers slope towards the bottom of the moat, to prevent tunneling under them. In the upper stories of the towers were loopholes protected by covered recesses. The placement of the towers is such that the entire circumference of the fortress walls could be covered by cross fire. Almost every tower incorporated sally ports into the moat, with narrow staircases; the steps are unusually high, to make enemy penetration from the outside more difficult. In the courtyard between the walls of the outer fortress and the inner fortress were large halls covered with vaults. These served as stables, storehouses and living space and gave access to defensive positions on the roofs.
The Inner FortressWithin the inner walls lies the inner fortress (the Keep or Donjon). Another square design, measuring approximately 50 x 50 metres, this keep could sustain a siege even if the outer walls were to fail. Well-protected cisterns allowed a plentiful supply of rainwater for those within the walls in times of siege. Standing two storeys high was an open courtyard at the centre. Vaulted spaces in the walls served as refectory, kitchen, meeting hall, stores, living quarters etc. The upper story served as the command headquarters of the fortress and included the apartments of the the knights, as well as a small chapel built of limestone and roofed with cross vaults. |
|
|
|||||||||||||
|
||||||||||||||||
|
The Battle of Belvoir CastleIn the campaign and Battle of Belvoir Castle (Kaukab al-Hawa), a Crusader force led by King Baldwin IV of Jerusalem sparred inconclusively with an Ayyubid army from Egypt commanded by Saladin. Saladin had seized control of Egypt in 1169 and established the Ayyubid Sultanate soon after. He began extending his dominion over Muslim emirates in Syria formerly held by Nur al-Din. In 1177, Saladin mounted a major invasion of the Kingdom of Jerusalem from Egypt and was defeated by King Baldwin IV (the "Leper King" of Jerusalem) at the Battle of Montgisard.Two years later in 1179, Saladin defeated Baldwin at the Battle of Marj Ayyun. In 1180, Saladin arranged a truce between himself and two Christian leaders, King Baldwin and Raymond III of Tripoli. Two years later, the lord of the Transjordan fief of Kerak, Reynald of Châtillon, attacked Muslim caravans passing through his lands. Resenting this violation of the truce, Saladin immediately assembled his army and prepared to strike. On May 11, 1182, Saladin left Egypt and led his army north toward Damascus via Aila on the Red Sea.. At a council of war, the Crusader princes pondered their reponse. They could move across the Jordan River to protect the exposed fiefs. Raymond of Tripoli argued against this strategy, saying that would leave too few soldiers to protect the kingdom. The aggressive Baldwin overruled Raymond and the Crusader army moved to Petra in the Transjordan, defending the exposed fiefs. Saladin's nephew, Farrukh Shah, led a force from Damascus to ravage the now-undefended Latin Principality of Galilee. In this destructive raid, the emirs of Bosra, Baalbek and Homs and their followers joined Farrukh. Before returning to Damascus. Out in the Transjordan, the main armies faced each other. A Frankish plan was proposed to occupy the water points, thus forcing Saladin into the desert, but the Crusaders were unable to carry this out. The Saladin moved north and reached Damascus on June 22. The Crusaders recrossed the Jordan into Galilee and concentrated their army at Sephoria, six miles northwest of Nazareth. After a three weeks, Saladin marched out of the Damascus on July 11 and advanced to Al-Quhwana on the southern shore of the Sea of Galilee. From there he sent forces to raid the Jordan valley, Jenin and the district of St Jean d'Acre. One raiding column attacked Baisan but was driven off. Saladin took his main army, crossed to the west side of the Jordan and moved south along the high ground. As soon as reconnaissance patrols revealed the Muslim leader's manoeuvre, the Frankish leaders determined to move their field army into close contact. After adding reinforcements by stripping nearby castles of most of their garrisons, the Crusader army marched to Tiberias then turned south. In the vicinity of Belvoir castle, Baldwin's men spent the night in their closely guarded camp. The next morning, the Ayyubid army confronted the Crusaders. The Franks advanced in their usual formation when in contact with their enemies. The infantry marched in close order, with the spearmen guarding against direct attack and archers keeping the Saracens at a distance. Shielded by the footmen, the cavalry conformed to the pace of the infantry, ready to drive back their enemies with controlled charges. The Crusaders had successfully used this tactic in the Battles of Shaizar (1111) and Bosra (1147). Saladin's soldiers tried to disrupt the Crusader formation by raining arrows from their horse archers, by partial attacks and by feigned retreats. The Franks could neither be tempted into fighting a pitched battle nor stopped. Unable to make an impression on the Latin host, Saladin broke off the running battle and returned to Damascus. Saladin had arranged for an Egyptian fleet to attack Beirut. As soon as his scouts had spotted the fleet from the Lebanese mountains, Saladin left Damascus, marched through the Munaitra Pass and laid siege to Beirut. At the same time, a force from Egypt raided the southern part of the kingdom, doing further local damage. Baldwin recalled his army to Sephoria then marched to Tyre. From there he appropriated shipping and organized an attempt to relieve the port of Beirut by both land and sea. When Saladin heard of these efforts, he raised the siege and ended his campaign in August 1182. Saladin spent the next twelve months campaigning in Syria and Mesopotamia, adding Aleppo and a number of other cities to his growing empire. He would invade the Kingdom of Jerusalem again in September 1183. Free of his adversary, in October 1182 Baldwin recovered Habis Jaldak in the Transjordan. In December, Raymond of Tripoli launched a raid in the same area and Baldwin took a mounted force within a few miles of Damascus. But these were pinpricks. Not long afterward, Baldwin became incapacitated by leprosy and was forced to appoint his sister Sibylla's husband Guy of Lusignan as regent. The Crusaders kept their enemies from capturing any strongholds and retained their field army intact, so they succeeded in their strategic purpose. But Saladin's raiders managed to inflict great damage on the countryside. Frankish overlords depended on the rents of their tenants, and these could not be collected if the crops were ruined. Without money, the lords could not pay their soldiers. Constant devastations would ultimately reduce the Frankish kingdom to helplessness.
|
|
|
|||||||||||||
|
|
|||||||||||||||
|
|
|||||||||||||||
|
|
||||||||||||||||
|
|
|
|
||||||||||||||
|
|
|
||||||||||||||


|
|||||||||
| :::: Link to us :::: Castle and Manor Houses Resources ::: © C&MH 2010-2014 ::: contact@castlesandmanorhouses.com ::: Advertising ::: |